Integral Proportional Integral Proportional Valve Wuxi huaoulai automation equipment Co., Ltd , https://www.china-hol.com
Can I Just Replace My Toyota’s Side Mirror Glass?
If your Toyota's side mirror glass is broken, you might not need to replace the entire mirror assembly. In most cases, replacing just the glass can restore full functionality and save you both time and money. This simple fix is often overlooked, but it’s a great way to keep your car in top shape without breaking the bank.
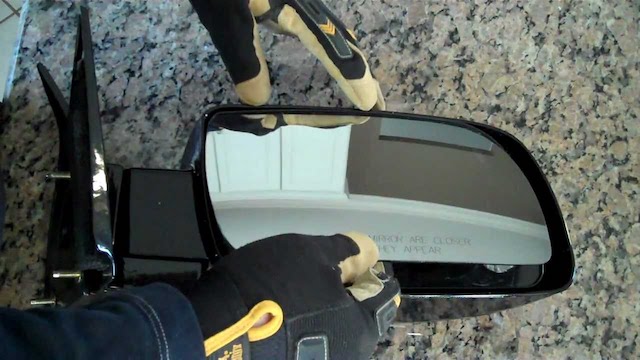
*Image credit: AutoandTruckMirrors*
### The Benefits of Replacing Just the Glass
There are several advantages to replacing only the glass instead of the whole mirror:
- **Faster:** Replacing the entire mirror can take 1–3 hours, while replacing just the glass usually takes less than 20 minutes.
- **Easier:** You don’t need to remove any interior panels or deal with complex wiring when replacing just the glass.
- **More Affordable:** A single piece of glass can cost hundreds of dollars less than a full mirror assembly. For example, the glass for a 2017 Toyota 4Runner is about $175 cheaper than the full assembly.
If you were in our shoes, we’d definitely go for this cost-effective solution. However, before jumping in, make sure the rest of the mirror assembly is still in good condition.
### How to Check Your Side Mirror Assembly
It’s easy to test if the rest of the mirror is working properly:
1. **Inspect the housing** for cracks or damage, especially around the pivot point.
2. **Gently move the mirror** in all directions to check for looseness. If it feels wobbly, it may just need tightening.
3. **Test power mirrors** by sitting in the driver’s seat and adjusting the mirror left, right, up, and down. If it doesn’t respond, there could be a wiring issue or mechanical damage.
If everything else is working fine, then replacing just the glass should do the trick. But if the assembly isn’t functioning as it should, a full replacement is the way to go.
### Replacing Your Side Mirror Glass
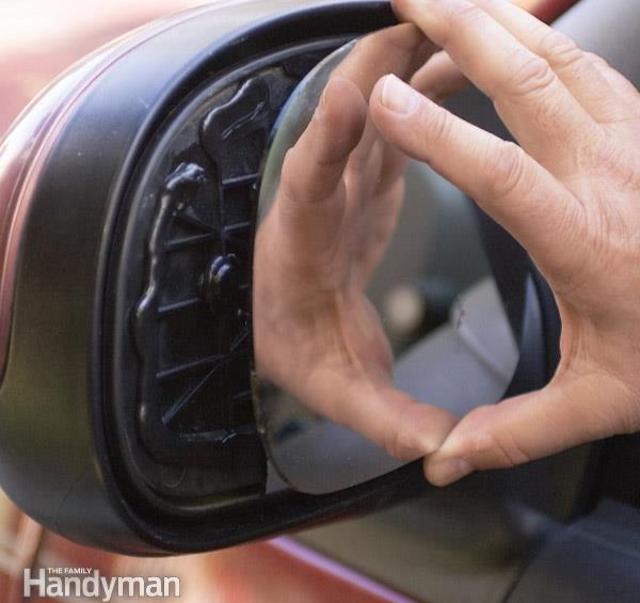
*Image credit: Family Handyman*
This guide is based on the Toyota Camry, but the process is similar for most Toyota models. If you're unsure, YouTube is a great resource for model-specific tutorials.
#### Step 1: Remove the Broken Glass
1. Order an OEM replacement glass from a trusted seller.
2. Cover the broken glass with masking or duct tape to protect yourself and prevent a mess.
3. Tilt the mirror down and locate the two hooks behind it. Use a small tool to unhook them.
4. Carefully pop the glass out of the housing.
#### Step 2: Prepare the New Glass
Pro Tip: Warming up the plastic housing with a hairdryer makes installation easier.
1. Put on thick gloves.
2. Remove the old glass and clean the housing thoroughly.
3. Scrape off any remaining adhesive with a razor blade.
4. Clean the back of the new glass and the housing with rubbing alcohol.
5. Place the double-sided tape on the housing, spacing the pieces apart.
6. Position the new glass over the tape and snap it into place, starting with the most angled corner.
#### Step 3: Install the New Glass
1. Ensure all mounting pins are aligned correctly.
2. Gently press the new glass into the housing until it clicks into place.
3. Test the mirror using the power controls to confirm it’s working.
### Final Thoughts
That’s it! Replacing just the glass is a quick, simple, and cost-effective solution. If you enjoyed this guide, be sure to check out some of our other DIY tips:
- [How To Know When To Replace A Toyota Cabin Air Filter](#)
- [Can I Just Replace My Toyota’s Side Mirror Cover?](#)
- [7 Car Parts You'll Need To Replace Soon](#)
Let us know if you need help with anything else—happy driving!